The Best Way to Bake Bread in Your Oven (no tools)
Baking bread in your home oven can sometimes be a hassle. Some people resort to using a dutch oven. The dutch oven works but is expensive and only allows you to bake one bread at the same time. The method shown in this post is cheaper and allows you to bake multiple breads at the same time.
When baking bread steam is essential in your home oven. Steam prevents the crust from developing. This means your dough can spring more in the oven and increase in size. The resulting bread is going to be much more fluffy compared to bread not baked with enough steam.
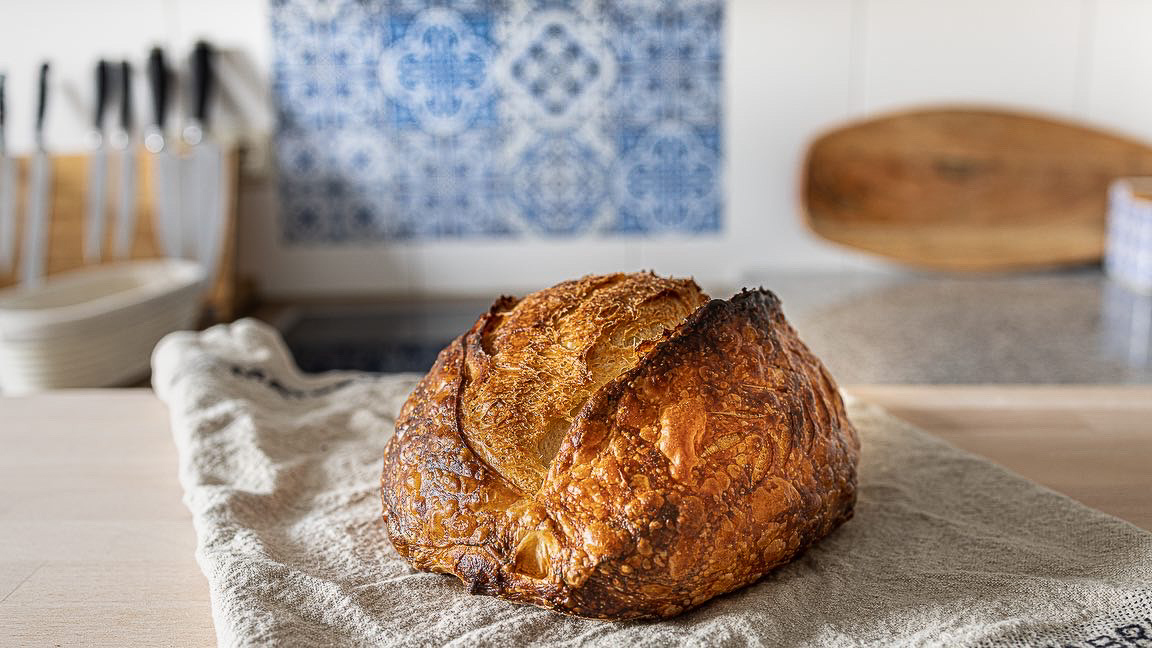
When not using enough steam you will see that your bread starts to open at the bottom or the sides. When cutting your bread you might notice several small pockets towards the top part of your bread. These are all signs that you should improve your steam game.
Prerequisites
For this to work you will need a home oven where the fan can be deactivated. If you can’t or if you have a gas oven, then you will need to use a dutch oven. You can also consider making flat breads on your stove. Please check at the end of the post how to make your DIY dutch oven.
- You need 2 trays. Ideally one that is inverted.
- One heat resistant bowl that won’t shatter when you place water inside. Metal is great. Some clay could also work. Glas will not work. A small metal pot will work great
- Optional - a baking stone
Process

The above chart shows the full process from start to finish how to bake a bread. This is the same for all bread types. So this will work for breads, buns and baguettes.
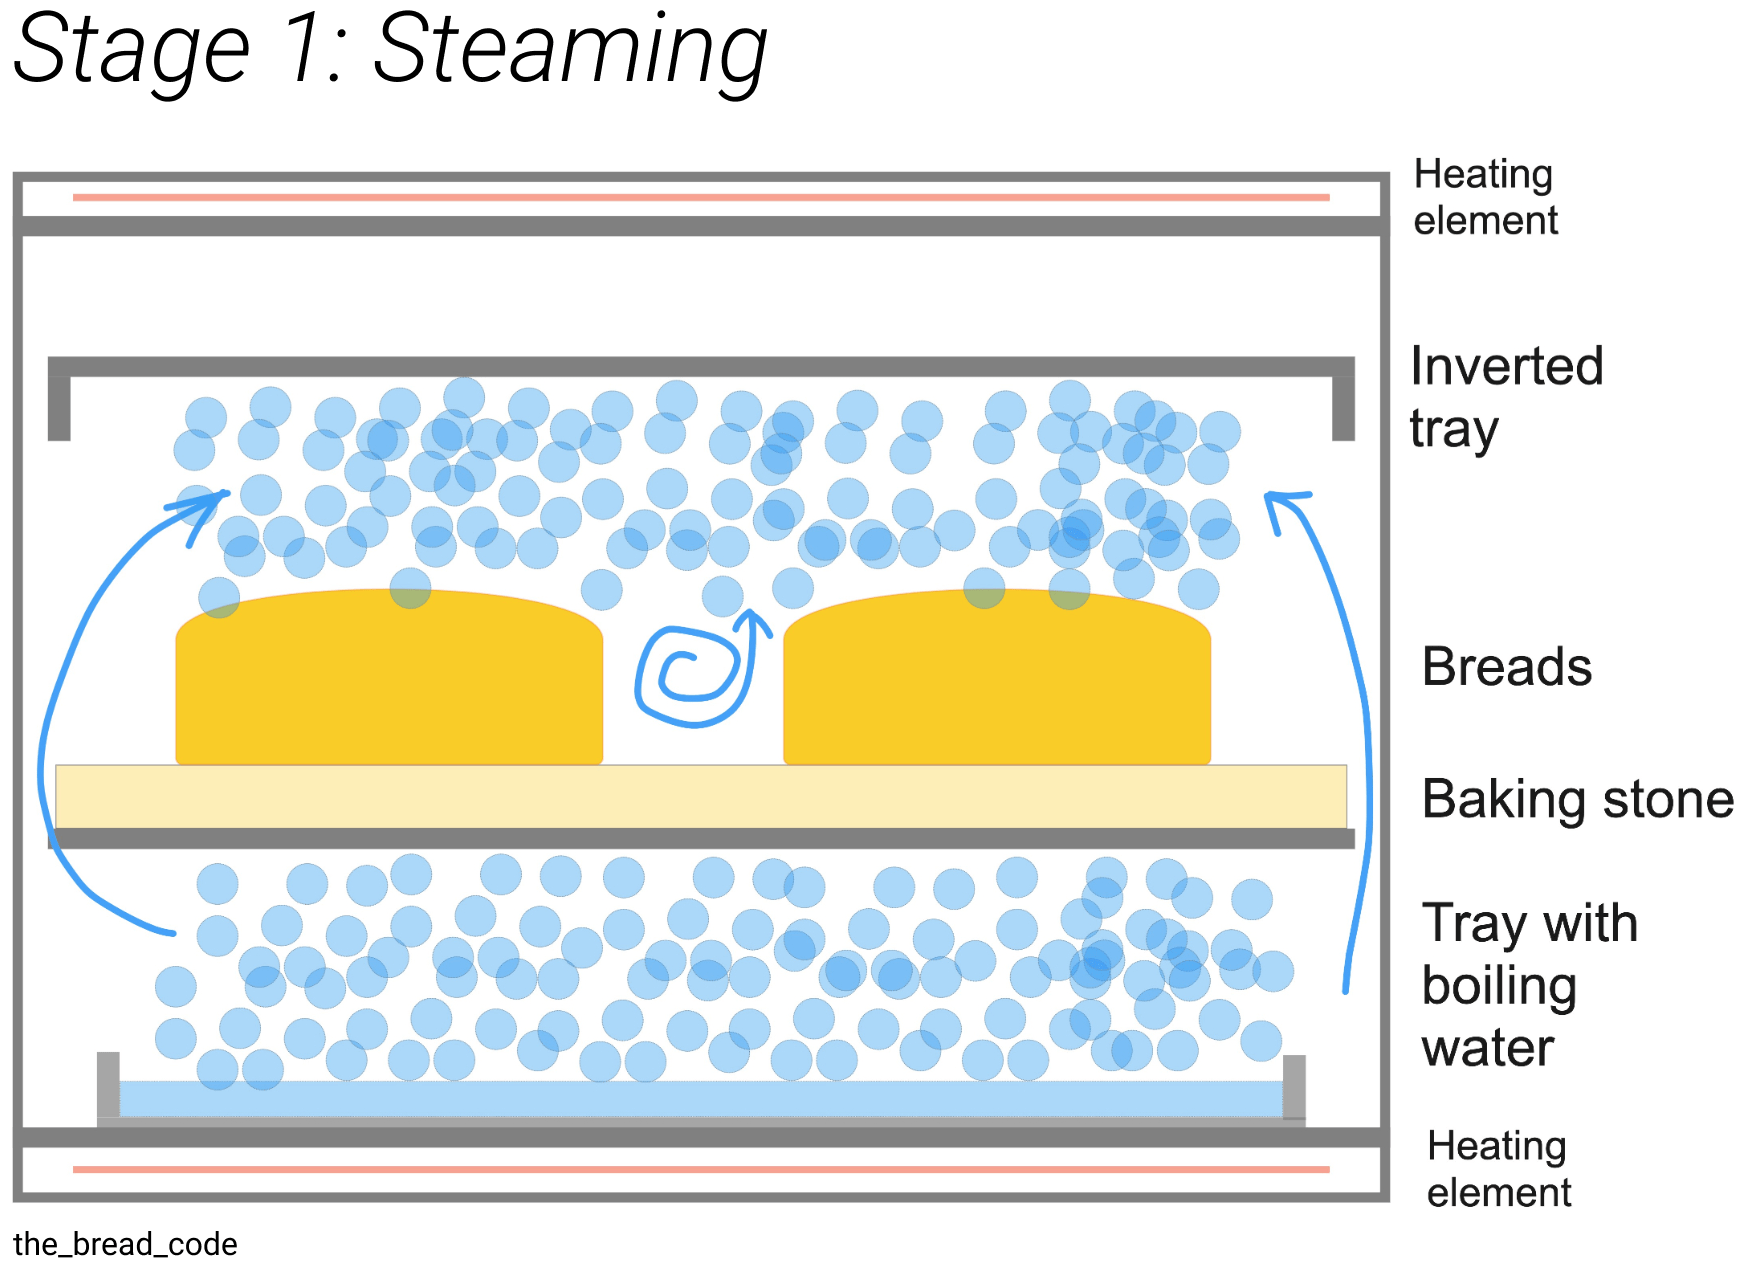
We are sort of simulating the dutch oven with this setup. By having an inverted tray on top you are shielding your dough from the top heat coming from the heating elements. The steam that evaporates from the bottom stays below the top tray and provides a steamy environment for your bread dough.
This is essential as you don’t want the top dough temperature to increase too much. At around 140°C (280°F) the maillard reaction starts to build a thick crust. Once the crust has been built the dough can no longer vertically expand in the home oven. The inner parts of your dough will continue to expand reaching the crust. This is the reason why the large pockets ultimately form as the dough can’t properly expand. The sides crack open as they are typically not as thick yet.
When utilizing the demonstrated method this will not happen. The temperature on the outer parts of your dough stays at around 100°C (210°F). As the top tray has not been preheated some of the steam will start to condense on it. After a while it will evaporate again further cooling the environment around it. As more and more water from your dough evaporates an additional cooling effect takes place. Your dough can expand as much as possible with no crust development.
Once the core temperature of your dough has reached around 92°C (197°F) your dough has finished baking. You could remove the dough from the oven and eat it. You could also store the half baked dough in the fridge, mail it to someone or freeze it. This was actually what I did for my parbakery project. The idea was to ship half baked bread and allow customers to heat it again in their own home oven.
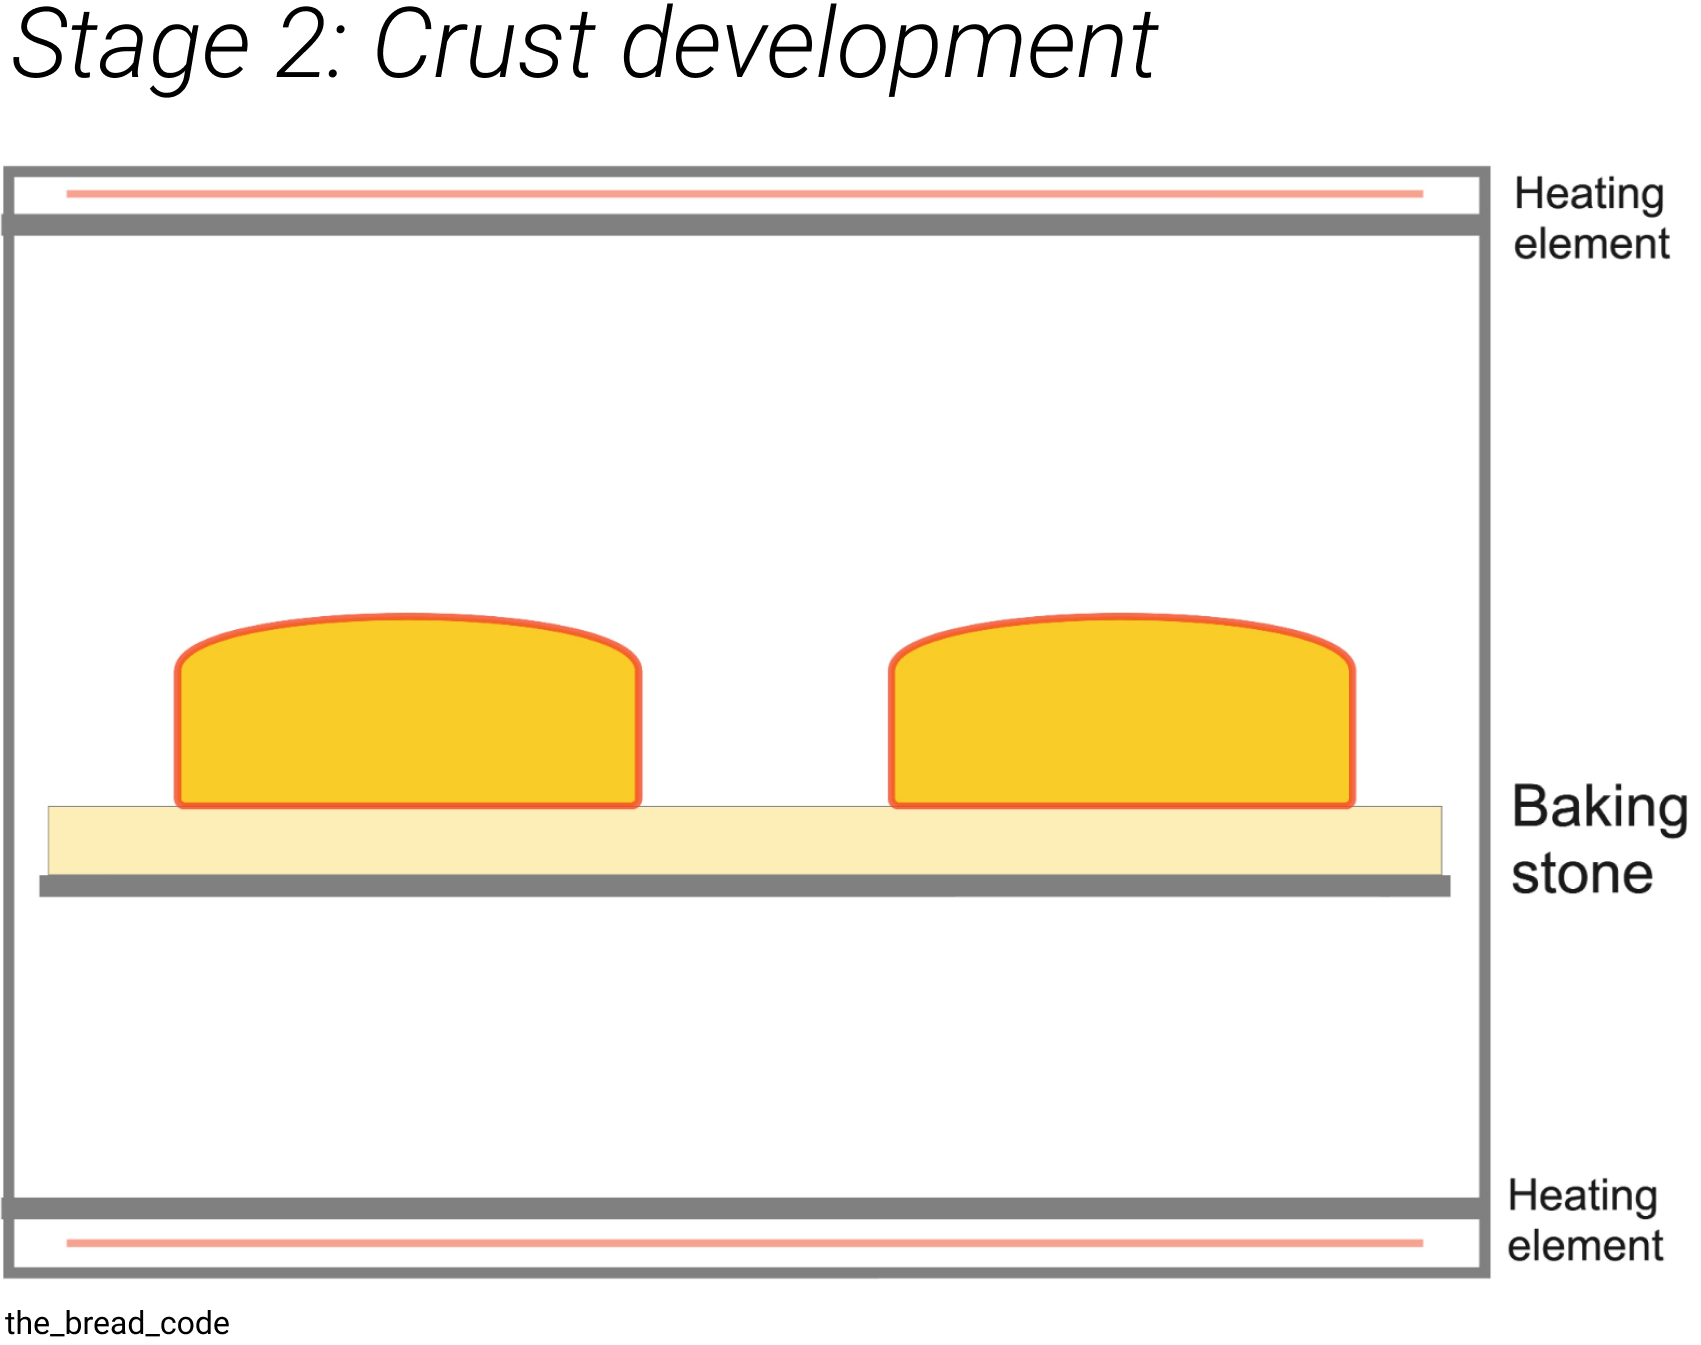
Normally a pale bread is not desired. People appreciate a thick dark crust on the bread. This paired with the fluffy crumb creates amazing flavor. The second stage of the bake is about building the crust. For this you remove all sorts of steam from the oven. You allow the higher temperature to create the crust. The maillard reaction starts to deform proteins, sugars and starches. Each color adds additional flavor to your final bread. This stage takes as long as you like. You can control how dark and crisp you like the crust to be. Some people prefer a thick crust, others not as much. I typically wait for another 15-25 minutes.
Wrong oven temperature
Please carefully measure your oven’s temperature. Chances are that the temperature is off. What’s written on the scale doesn’t necessarily mean that it is true. You can use an infrared or BBQ thermometer to measure the temperature properly.
Without stone
If you don’t have a that is no problem. Simply place your dough on the preheated bottom tray. Parchment paper can do wonders in making sure your dough does not stick. The parchment paper can also help with making transferring of the dough a lot easier.
Steam ovens
A family member of mine owns a steam oven. Without the inverted tray the results weren’t as good as I had hoped. So even when using the steam oven I recommend to place the inverted tray on top of your to be baked doughs.
DIY Dutch Oven
If you don’t have the 2 trays but have a large metal pot, then simply place this large metal pot on top of your dough. This will simulate the dutch oven.
Resources
All this content is also part of my completely free book that you can find here.
You can also read about different mistakes you can spot by looking at your doughs crumb. I wrote a complete guide on debugging your bread.
In this video I show you the ideal temperature for baking sourdough bread. This includes a lot of testing with temperature controls.
Frequently asked questions on the topic
When is a bread dough done?
Use a thermometer. At 92°C (197°F) the dough is finished. You can continue to bake to build a thicker crust.
Why is steam for baking important?
The steam prevents a crust from forming. This means your dough can expand more in the oven and will create a fluffier bread.
Is a dutch oven good for baking bread?
A dutch oven is not needed. You can simply use an inverted tray to simulate the dutch oven
How to make your own dutch oven for bread making?
Simply place a large metal pot on top of your dough. Or place an inverted tray on top.
How can I make 2 breads at the same time with a dutch oven?
You could stack the dutch ovens, or use an inverted tray as replacement for your dutch oven.
How long should a bread be baked?
Typically around 30 minutes with steam and another 25 minutes without steam.
Why is my crust pale?
Remove the source of steam after the first half of baking. Then bake your dough for as long as is needed to achieve the desired crust color.
Why are there large pockets in my bread's crumb?
Chances are you might have baked for a too hot temperature. Consider lowering it and optimizing and improving your steaming technique.